

I did some more moulding with it over the weekend using two different methods and the results are so different to each other.
The first one is really quick. Here's what I did:
I cut 3 different colours of Friendly Plastic - two of them are square and the third one rectangular because of how the mould is positioned on the mould mat.

Krafty Lady art mould AM344 3 Crowns
I worked with one piece at a time, placing it over the chosen shape, metallic side down and heated it with the heat gun until it became shiny and began to droop down into the mould. So that I didn't burn myself and have plastic sticking to my fingers, I dipped them in water first and then worked it into the crevices of the mould and when I was happy that all the mould was filled I placed the mould into a bowl of cold water for about 30 seconds and then popped the crowns out. That's pretty simple..... and really effective.

I used my trusty Cuttlebug to emboss the green card (this is fast becoming my favourite papercrafting tool) and then rubbed a bit of Rub 'n Buff over some of the texture. I also ran a piece of gold mirror card through the Cuttlebug with the same embossing folder and painted it with black acrylic paint. I wiped away most of it with paper towelling so that it was only left in the crevices - and voilà, it looks like embossed metal!
 Some organza ribbon and pronged studs finish it off.
So it was on to the next method. This time, instead of cutting a square of Friendly Plastic, I cut narrow strips. I began with a piece of Fuchsia about 6mm wide which I cut it into 3 pieces. I placed them in the centre of the mould and heated with the heatgun as above. Once again, I wet my fingers and worked the plastic until the edges were melted together. Then I cut 5 strips from the Mother of Pearl stick and trimmed them to the right length to fit into each petal and placed them in the mould. I trimmed the offcuts into thin slivers and packed the sides of the mould where it was needed and then melted it with the heat gun. With wet fingers, I worked all the edges together until they were smooth. There were still a few gaps so I added more slivers and heated it again until it melted and smoothed again with wet fingers. Then I placed the mould into the basin of water until it cooled and popped it out. This was a little bit more time consuming but it gives a very different effect to the first method.
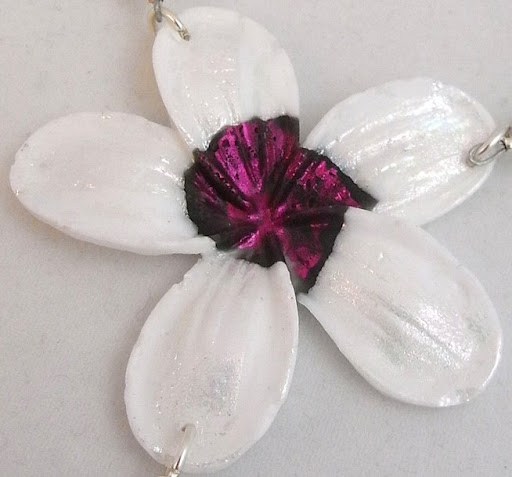 This was the perfect centre piece for a necklace. All it needed was some simple beading to set it off. I chose pale green glass beads and chunky silver-lined seed beads which I threaded on tiger tail and then connected with jump rings to the petals - a really delicate looking necklace.
 The frangipani mould is also from Krafty Lady (AM344)

